In today's digital age, where attention spans are shorter than ever, having a fast-loading website is crucial. Not only do users expect web pages to load quickly, but search engines like Google also prioritize faster websites in their rankings. One of the most effective ways to speed up your site is by optimizing your images. In this comprehensive guide, we'll explore how to optimize images for faster website load times and better SEO. From understanding image formats to using the right tools, we'll cover everything you need to know.
Why Image Optimization Matters
Before diving into the how-to, let's discuss why image optimization is so important.
- Improved Load Times: Large, unoptimized images can significantly slow down your website. Faster load times lead to a better user experience and lower bounce rates.
- Better SEO: Search engines favor websites that load quickly. Optimized images can improve your site's search engine ranking, leading to increased visibility.
- Reduced Bandwidth Usage: Optimized images consume less bandwidth, which is particularly important for mobile users and those with limited data plans.
- Enhanced User Experience: Fast-loading images improve the overall user experience, leading to higher engagement and conversion rates.

Understanding Image Formats
Choosing the right image format is the first step in optimizing images. The most common formats are JPEG, PNG, GIF, and WebP. Each format has its advantages and best use cases.
JPEG (Joint Photographic Experts Group)
- Best For: Photographs and images with many colors.
- Advantages: High compression with acceptable quality loss, widely supported.
- Disadvantages: Lossy compression can result in quality loss, not suitable for images with transparency.
PNG (Portable Network Graphics)
- Best For: Images requiring transparency, such as logos and icons.
- Advantages: Lossless compression (no quality loss), supports transparency.
- Disadvantages: Larger file sizes compared to JPEG.
GIF (Graphics Interchange Format)
- Best For: Simple animations and low-color images.
- Advantages: Supports animation, small file sizes for simple images.
- Disadvantages: Limited to 256 colors, not suitable for photographs.
WebP
- Best For: Both photographs and graphics.
- Advantages: High compression with good quality, supports both lossy and lossless compression, supports transparency.
- Disadvantages: Not supported by all browsers (though this is improving).
Choosing the Right Image Format
When deciding which format to use, consider the type of image and the desired quality:
- Use JPEG for photographs: High-quality images with lots of colors and details.
- Use PNG for graphics with transparency: Logos, icons, and images requiring transparency.
- Use GIF for animations: Simple animations and low-color images.
- Use WebP for best of both worlds: If supported by your audience's browsers, WebP is often the best choice.
Compressing Images
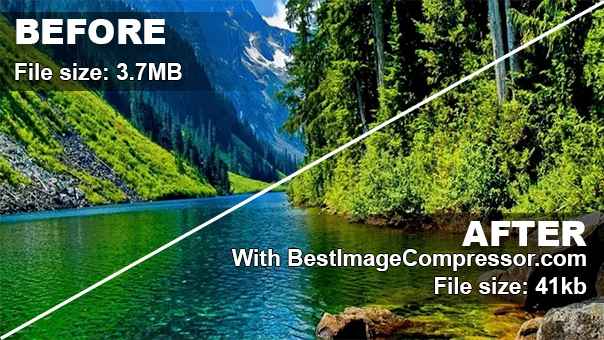
Compression is the process of reducing the file size of an image without significantly affecting its quality. There are two types of compression: lossy and lossless. There is a free tool BestImageCompressor.com which will perform this task for you quickly and easily.

Lossy Compression
- How it works: Reduces file size by removing some of the image data. This can result in a slight loss of quality.
- Best for: Situations where file size is more critical than perfect image quality, such as web use.
- Tools: JPEG Optimizer, TinyPNG, Compressor.io.
Lossless Compression
- How it works: Reduces file size without any loss of quality. It maintains all the original data.
- Best for: Situations where image quality is critical, such as professional photography.
- Tools: PNGGauntlet, ImageOptim, OptiPNG.
Tools for Image Optimization
Numerous tools can help you optimize images. Here are some popular ones:
Online Tools
- TinyPNG: Compresses PNG and JPEG images, reducing file size while maintaining quality.
- Compressor.io: Offers both lossy and lossless compression for JPEG, PNG, GIF, and SVG images.
- ImageOptim: A free tool that optimizes images without losing quality, available for Mac users.
Desktop Applications
- Adobe Photoshop: Offers advanced image editing and compression options.
- GIMP: A free, open-source alternative to Photoshop with powerful image optimization features.
- JPEGmini: Reduces the file size of JPEG images without compromising quality.
Build webpages quickly and efficiently with this WordPress plugin.
WordPress Plugins
- Smush: Automatically optimizes images when you upload them to your WordPress site.
- EWWW Image Optimizer: Compresses images using the best available methods.
- ShortPixel: Optimizes images and PDFs, offering both lossy and lossless compression.
Resizing Images
In addition to compression, resizing images can significantly impact load times. Large images scaled down using HTML or CSS still retain their original file size, which is inefficient. Instead, resize images to the exact dimensions required.
How to Resize Images
- Determine the Required Dimensions: Identify the size needed for each image on your website.
- Use Image Editing Software: Resize images using tools like Photoshop, GIMP, or even simple online tools like PicResize.
- Maintain Aspect Ratio: Ensure the aspect ratio is maintained to avoid distortion.
Implementing Lazy Loading
Lazy loading is a technique that delays the loading of images until they are needed. This improves initial load times and reduces bandwidth usage.
How Lazy Loading Works
- Initial Load: Only images above the fold (visible part of the page) are loaded initially.
- On Scroll: Images below the fold are loaded as the user scrolls down the page.
Implementing Lazy Loading
- Native Lazy Loading: Add the
loading="lazy"attribute to yourimgtags. Supported by most modern browsers.htmlCopy code<img src="example.jpg" loading="lazy" alt="Example Image"> - JavaScript Libraries: Use libraries like
lazysizesorLozad.jsfor more advanced lazy loading features.
Using Content Delivery Networks (CDNs)
A CDN is a network of servers distributed globally that deliver content to users from the closest server, reducing load times.
Benefits of Using a CDN
- Faster Load Times: Delivers images from servers closer to the user.
- Reduced Bandwidth Usage: Offloads traffic from your primary server.
- Improved Reliability: Provides redundancy, ensuring content is always available.
Popular CDNs
- Cloudflare: Offers a free tier and various advanced features.
- Amazon CloudFront: Integrated with AWS services, ideal for large-scale websites.
- Akamai: Known for its extensive global network and high performance.
Optimizing Image Alt Text
Alt text (alternative text) is used to describe the content of an image to search engines and users who cannot view the image. Properly optimized alt text can improve SEO and accessibility.
Writing Effective Alt Text
- Be Descriptive: Clearly describe the content and function of the image.
- Use Keywords: Include relevant keywords naturally.
- Keep It Concise: Aim for a balance between detail and brevity.
Examples of Good Alt Text
- For a product image:
alt="Men's blue denim jacket" - For a blog image:
alt="Aerial view of a forest in autumn"
Leveraging Image Sitemaps
Image sitemaps help search engines index images on your website, improving their visibility in search results.
Creating an Image Sitemap
- List Image URLs: Include URLs of all images you want indexed.
- Add Metadata: Provide additional information like title, caption, and geographical location if relevant.
- Submit to Search Engines: Submit your sitemap to search engines using tools like Google Search Console.
Example of an Image Sitemap
xmlCopy code<urlset xmlns="http://www.sitemaps.org/schemas/sitemap/0.9" xmlns:image="http://www.google.com/schemas/sitemap-image/1.1">
  <url>
    <loc>http://example.com/image1.jpg</loc>
    <image:image>
      <image:loc>http://example.com/image1.jpg</image:loc>
      <image:caption>An example image</image:caption>
    </image:image>
  </url>
  <url>
    <loc>http://example.com/image2.jpg</loc>
    <image:image>
      <image:loc>http://example.com/image2.jpg</image:loc>
      <image:caption>Another example image</image:caption>
    </image:image>
  </url>
</urlset>
Implementing Responsive Images
Responsive images ensure that your images look good and load quickly on all devices, from desktops to mobile phones.
Using the srcset Attribute
The srcset attribute allows you to define different image sources for different screen sizes and resolutions.
Example of srcset
htmlCopy code<img src="small.jpg" srcset="small.jpg 500w, medium.jpg 1000w, large.jpg 2000w" sizes="(max-width: 600px) 480px, (max-width: 1200px) 800px, 1200px" alt="Responsive Image">
Compressing Images with GZIP
GZIP is a file compression method that reduces the size of web files, including images, before they are sent to the user's browser.
Enabling GZIP Compression
- Edit .htaccess File: Add the following code to your
.htaccessfile to enable GZIP compression.apacheCopy code<IfModule mod_deflate.c> AddOutputFilterByType DEFLATE image/jpeg AddOutputFilterByType DEFLATE image/png AddOutputFilterByType DEFLATE image/gif </IfModule> - Use Server Settings: Configure your server to enable GZIP compression. Instructions vary depending on the server type (e.g., Apache, Nginx).
Using SVG for Graphics
SVG (Scalable Vector Graphics) is a vector image format that is perfect for logos, icons, and other graphics that need to scale without losing quality.
Benefits of SVG
- Scalability: SVG images can be scaled to any size without losing quality.
- Small File Sizes: Often smaller than raster images like JPEG or PNG.
- Editable: Can be edited with text editors and manipulated with CSS and JavaScript.
Example of an SVG Image
htmlCopy code<svg width="100" height="100" xmlns="http://www.w3.org/2000/svg">
  <circle cx="50" cy="50" r="40" stroke="green" stroke-width="4" fill="yellow" />
</svg>
Optimizing Images for Retina Displays
Retina displays have higher pixel density, requiring higher resolution images to look sharp. However, high-resolution images can be larger and slower to load.
Providing Retina-Ready Images
- Use
srcset: Include higher resolution versions of images using thesrcsetattribute. - Serve Responsive Images: Ensure images are appropriate for the device's pixel density.
Automating Image Optimization
Manually optimizing images can be time-consuming, especially for large websites. Automate the process using tools and plugins.
WordPress Plugins for Automation
- WP Smush: Automatically optimizes images on upload.
- Imagify: Offers automatic optimization and bulk optimization options.
- ShortPixel: Provides automated image compression and optimization.
Keeping Up with Image Optimization Trends
Image optimization is an evolving field. Stay updated with the latest trends and best practices to ensure your website remains fast and SEO-friendly.
Emerging Trends
- AI-Powered Optimization: Tools that use artificial intelligence to optimize images.
- New Formats: Keep an eye on new image formats like AVIF that promise better compression and quality.
Resources for Staying Updated
- Google Webmasters Blog: Updates and best practices from Google.
- Web Performance Blogs: Sites like Smashing Magazine and CSS-Tricks often cover image optimization.
- Developer Communities: Forums and communities like Stack Overflow and GitHub.
Real-World Examples of Image Optimization
Seeing real-world examples can help you understand the impact of image optimization. Here are a few case studies:
Case Study 1: Ecommerce Site
- Initial Load Time: 5 seconds
- Optimizations Applied: Image compression, lazy loading, CDN integration.
- Post-Optimization Load Time: 2.5 seconds
- Impact: 20% increase in conversion rates, 15% decrease in bounce rates.
Case Study 2: Blog
- Initial Load Time: 4 seconds
- Optimizations Applied: Resizing images, using WebP format, enabling GZIP compression.
- Post-Optimization Load Time: 1.8 seconds
- Impact: 25% increase in page views, 10% increase in average session duration.
Monitoring and Analyzing Image Performance
Regularly monitor and analyze your website's image performance to identify areas for improvement.
Tools for Monitoring
- Google PageSpeed Insights: Provides insights and suggestions for improving page load times.
- GTmetrix: Offers detailed reports on page performance and image optimization.
- WebPageTest: Analyzes website performance, including image loading times.
Key Metrics to Track
- Load Time: Time taken for images to load.
- Image Size: File size of images.
- Number of Requests: Number of image requests made by the browser.
Conclusion
By following these best practices and leveraging the right tools, you can significantly improve your website's load times and SEO performance through effective image optimization. Whether you run an ecommerce site, a blog, or any other type of website, optimizing your images is a crucial step toward providing a better user experience and achieving higher search engine rankings. Start implementing these techniques today and watch your website's performance soar!
Other Resources
Best Image Compressor – Quickly shrink the size of your images while maintaining quality


